

 As arranged I arrived early afternoon to the Osprey Centre in Boat of Garten. Similar to the dolphin’s you don’t know what to expect and what you will capture, however I was lucky enough that when I arrived the female Osprey was sitting guard in her nest as the male Osprey was off fetching food for the female. Photographing the Osprey was pretty challenging, they are a very protected species by the RSPB which I can understand and therefore limited access from the viewpoint of their nest. The Osprey nest is a good distance from the centre which I can respect and therefore I was limited to the shots I could capture of the Osprey. I also tried to avoid photographing where the camera points down at the nest to appear more natural.
As much as I would have preferred to have captured some stunning closeup shots of the Osprey in action, I did manage to capture the female taking off with her food as the male returned to the nest with the catch which was a special moment. From that the female was spotted off to the distance perched on a dead tree eating the fish, I did manage to
capture a few interesting images from that which could be classified with a camouflage technique. To capture the Osprey in action I used my Sigma 150-600mm Sport lens with my 5D Mark iii set to high speed drive mode and with a faster shutter speed I was required to use a higher ISO number to capture the correct exposure. I did use a narrower  aperture for some images for extended depth of field so my settings varied.
I was severely limited to techniques I could use for photographing the Osprey and their nest and since I already had a silhouette shot of an Osprey nest from Loch Insh I decided to concentrate on a composite image which tells a story. There were telescopes put into position to help spot the Osprey and this helped for direction when looking for the female perched on the dead tree eating her catch. There were several other birds I managed to capture in the surrounding forest area just outside the Osprey centre at the car park and was delighted with some of the pictures I captured. I also managed to capture a landscape image of the forest that really caught my eye with the light breaking through the trees, using the extended depth of field with the narrow aperture, slower shutter speed I managed to capture a stunning landscape which has potential to be used for some of the wildlife I’ve already captured such as the red squirrels etc.
Here is a sample contact sheet of some of the best images from that shoot: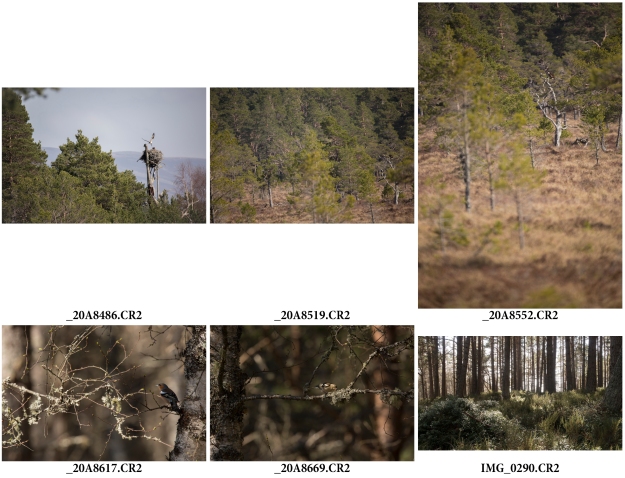
The first image was one of my favourites as I managed to capture the female just as she was taking off with the fish which you can see clutched in her claw and was pleased with the composition; the second and third images I used for different perspective both of which have the eyes searching for the female Osprey, the portrait shot I wanted to show more of the landscape leading to where the female Osprey was perched to make the viewer feel closer. For the fourth and fifth picture I was delighted to capture two of the smaller birds on the trees and the lighting captured my eye; the final image showing the landscape shot I captured through a forest with the light breaking through, one of my favourite landscape shots.
Here is a sample contact sheet of some of the bad images:
The first image shows the ledge from shooting through the window, the weight of the Sigma 150-600mm lens can sometimes be troublesome holding for a lengthy period of time handheld; the second image I captured the female Osprey flying back to the nest, however it was out of focus and I felt in the third image there was too much over exposure on the leaves from the sun and not as favourable on the angle.
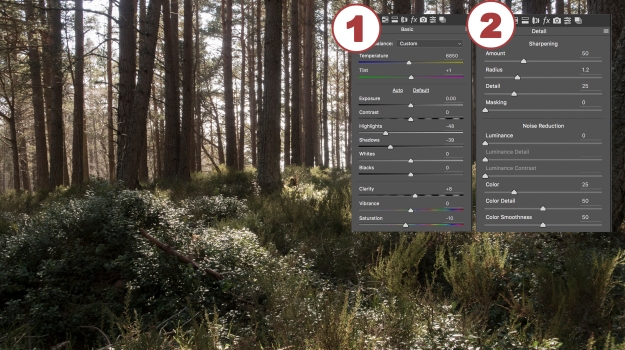
For post processing of my favourite shot I reduced the highlights and shadows, increased clarity and slightly reduced saturation to enhance the atmosphere of the forest, then increased sharpness of the overall image using Camera Raw.
Using the brush tool I began creating a scattered spotted brush by increasing the scattering and spacing.

Using the spotted scattered brush tool created, I painted over the image with smaller and larger brush sizes to desired effect with a light coloured brush matching the lightest areas of the photograph. Secondly using Filter > Blur > Radial Blur with zoom setting I created the blur effect with the new layer and finally I reduced the opacity of the rays of light to desired effect for the final image.


 With the weather forecasted for sunny weather tomorrow I have planned and booked for a Dolphin’s Spirit Cruise in Inverness as well as the Osprey centre in Boat Of Garten. The Dolphin Wildlife Spirit Cruise can take up to 60 passengers so I’m unaware of how busy the cruise maybe. The tour has been booked for 10am in the morning so I would hope that it would be relatively quite, whether this may go against me for capturing Dolphin’s is yet to be seen. There will no doubt be various birds and other wildlife surrounding the water that I would hope to capture. The Dolphin Spirit Cruise tours through the inner Moray Firth and admission costs will be £18 per adult. Given how unpredictable the Dolphins will be it would be nice to capture them jumping if lucky using the fast shutter speed, if any birds flying past I could hopefully capture some pan shots using the slower shutter speed. I also have to take into consideration whether the boat will be sturdy in movement that may go against me for using the slower shutter speed.


